
Blueprinting Rifle Actions
You might have heard the term and have some idea what the term means but don’t despair if you are in the dark. It isn’t any harder than woodpecker lips and maybe this will clear up some of the confusion.
Once you have that ultimate rifle barrel in hand that took 6 months longer than you thought for it to arrive you realize that a lot has to be done for it to shoot to its full potential. The machinist has struggled to make a rifled tube that is straight and consistent within .001 inch from end to end. Now it’s up to the gunsmith to do his part. This consist of cutting a chamber exactly in line with this bore and then making sure the action that will be behind this cartridge will be exactly in line with the bore and chamber. If anything is not either perpendicular or in line and parallel with the centerline established by the bore when the cartridge fires and pushes back against the bolt face forces will be transmitted angular to the center and result in pushing the barrel off center. This push will in the form of uneven barrel vibrations. Blueprinting an action is simply making every surface either in line or perpendicular (90 degrees) to the center line.
When we chambered our barrel we took great pains to center this barrel in the lathe. If possible we centered it on both ends within .0005 (1/2 thousandths). Then we cut the threads so we know whatever receiver we screw this barrel into that the chamber will be centered. So our first task is to find the center of the receiver. A few accessories come to our aid in this task. The first is an action mandrel. A mandrel is a device for holding work in a lathe. It has a long straight shaft that is turned to fit the center of the action where the bolt rides. It should fit within .001 and slide on without binding. Then it should have a threaded section that is threaded for a class A fit in the receiver threads. This mandrel will be turned outside the threaded section for maybe 2 inches and have center holes drilled in each end. This is important because if the mandrel can be screwed into the receiver with the short end but binds when you slide the long end into the receiver you know the receiver threads are the correct size but not centered in the receiver. This can be corrected by mounting the receiver in the lathe and threading on center. This is a very advanced operation and should only be attempted by an experienced operator. Another option is to use the action tap which looks like the mandrel but is really a tap with a long pilot that rides in the bolt track and cut threads square with the bolt. These taps come in standard and .010 oversize. If this tap is used the action will no longer accept a standard barrel so this is a big deciBlueprinting Rifle Actions
You might have heard the term and have some idea what the term means but don’t despair if you are in the dark. It isn’t any harder than woodpecker lips and maybe this will clear up some of the confusion.
Once you have that ultimate rifle barrel in hand that took 6 months longer than you thought for it to arrive you realize that a lot has to be done for it to shoot to its full potential. The machinist has struggled to make a rifled tube that is straight and consistent within .001 inch from end to end. Now it’s up to the gunsmith to do his part. This consist of cutting a chamber exactly in line with this bore and then making sure the action that will be behind this cartridge will be exactly in line with the bore and chamber. If anything is not either perpendicular or in line and parallel with the centerline established by the bore when the cartridge fires and pushes back against the bolt face forces will be transmitted angular to the center and result in pushing the barrel off center. This push will in the form of uneven barrel vibrations. Blueprinting an action is simply making every surface either in line or perpendicular (90 degrees) to the center line.
When we chambered our barrel we took great pains to center this barrel in the lathe. If possible we centered it on both ends within .0005 (1/2 thousandths). Then we cut the threads so we know whatever receiver we screw this barrel into that the chamber will be centered. So our first task is to find the center of the receiver. A few accessories come to our aid in this task. The first is an action mandrel. A mandrel is a device for holding work in a lathe. It has a long straight shaft that is turned to fit the center of the action where the bolt rides. It should fit within .001 and slide on without binding. Then it should have a threaded section that is threaded for a class A fit in the receiver threads. This mandrel will be turned outside the threaded section for maybe 2 inches and have center holes drilled in each end. This is important because if the mandrel can be screwed into the receiver with the short end but binds when you slide the long end into the receiver you know the receiver threads are the correct size but not centered in the receiver. This can be corrected by mounting the receiver in the lathe and threading on center. This is a very advanced operation and should only be attempted by an experienced operator. Another option is to use the action tap which looks like the mandrel but is really a tap with a long pilot that rides in the bolt track and cut threads square with the bolt. These taps come in standard and .010 oversize. If this tap is used the action will no longer accept a standard barrel so this is a big decision. The advantage is the threads will be concentric and not a little egg shaped from the tap only cutting out the tight spot.
Figure 10 Rethreaded and lug seats cut flat and square. Next step is to cut the action face square.
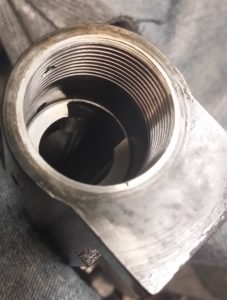
Figure 11 Using the tap for a mandrel and facing off the receiver mounted between centers in the lathe

Now our action has threads square with the center and we can proceed to cut the rest while the action is mounted on the mandrel and turned between centers. This is a quick operation and actually easier to cut than to check so I usually cut the front of the receiver with a facing tool only until it cleans up all the way around. If the bolt lug don’t show evidence of full contact with the seats in the receiver the bolt will be lapped in until machinist layout ink will be rubbed off both lugs when the bolt is worked in the action. If the lugs are too far out of contact (rare) the bolt can be mounted in the chuck and steady rest and the back of the lugs squared with a facing tool. Then they should be lapped and checked. The bolt lug seats in the receiver can also be squared in the lathe or with a lapping tool and lapping compound.
Now we have most of the receiver square and only have one more surface in the receiver to square. This is the bolt face. With the bolt closed and in firing position the bolt lapping tool can be screwed into the receiver and the bolt face lapped until it shows no sign of uneven contact. This tool can be made from an old cut off barrel bored out square with the threads for a 3/4 inch shaft mounted with a brass tip turned the diameter of the bolt face. All tolerances should be zero or close as possible. Of course you buy a tool from Brownells but that’s too easy.
Now the receiver face, bolt face, bolt lugs, bolt lug seats and threads are all square. But if you put it together without checking the recoil lug it might all be for nothing. If the lug is thicker on one side than the other it will push the barrel off center when it is tightened. The options are buying a replacement lug that is thicker and surface ground completely flat or grinding the lug you have on a surface grinder until flat. If the action was threaded with that oversize tap you will also have to open up the recoil lug so the barrel threads will go through without damage.
Now your action is ready to be fitted with that barrel. Obviously this work has to be finished before threading and chambering the barrel because most of these operations affect headspace. Cutting the receiver face and grinding the lug tighten headspace and squaring the bolt lugs, lug seats and bolt face will increase headspace. Of course the thread corrections have to be completed in the receiver first because the receiver is the “go” gauge for the barrel threads.
Work carefully and understand each operation and know your desired outcome. If there was ever a time to Do Good Work” this is it.