Professional Scope Mounting


Professional Scope Mounting


Don’t be deceived by what looks to be a simple job. Professional scope mounting takes training and a good working knowledge of gunsmithing to get the most out of the combination of gun, scope, mounts and ammo. Maybe the sporting goods store has a stock boy that can tighten down #6 screws tighter than the space shuttle’s gas cap but there is a lot more to this job than just making sure it is tight.
Let’s define a few terms before we go any farther to keep the confusion to a minimum

Ring- This is the round clamp that goes around the scope and has an arrangement on the bottom to attach it to the base.

Base- The small unit that attaches to the gun (usually with screw but not always) and provide a means for the ring to attach.

Eyepiece- the end of the scope next to shooters eye ( usually sharper than necessary!)

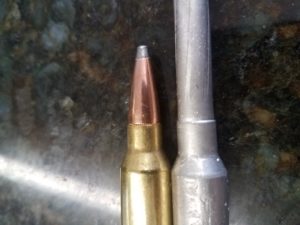
Objective end- The opposite end of the scope from the eyepiece. Measured in millimeters

Parallax- An error in viewing two object from different locations. Hold up your finger and look at the tip and the wall behind it, now move your eye around and the finger appears to move against the wall. This happens in the rifle scope when you look at a close target (like 25 yards) and move you head position on the comb of the stock. The crosshairs appear to move on the target. It can be adjusted to match the target distance or for most factory hunting scopes it is factory adjusted at 125 yards. It is basically a short range problem.

Picatinny- A military standard for a scope base similar to the weaver style. Weaver bases will attach to a Picatinny rail but Picatinny rings and devices will not fit on the Weaver base. If using a weaver ring on a Picatinny base it should be slide forward before the ring is tightened on the base. Even though weaver rings work this is not a desirable setup. Best to have the base match the ring. While originally a scope base these are used for almost any device being attached to a rifle like night vision equipment, flashlights or lasers.

Zero- A setting on the scope or sights that will align the aiming point and the strike of the bullet.

MOA- abbreviation for minute of angle. It equals roughly one inch at 100yards, two inches at 200, 5 inches at 500, and so forth. This also means it equals ½ inch at 50 yards, ¼ inch at 25 and so forth. So if your scope will move you ¼ minute per click then one click will move you 1/16 inch at 25 yards or 2.5 inches at 1000 yards. Read this over or draw it out with a straight edge or whatever you need to do but you have to understand MOA. When you want to move a scope that is centered 20 MOA to the left and the mounts are 3.8 inches apart it will require a good understanding of MOA!

Power- Usually denoted by a number followed by an X like 6X or many times in combination with the objective lens size like 6X42 would be a 6 power scope that has a 42 millimeter objective lens. Variable scopes have an adjustable setting and fixed scopes are only one power.

Collimator- A device to make a parallel line up. Used by the gunsmith to align the aiming point with the center of the bore. While it does not sight in the firearm it is a very useful tool allowing the gunsmith to see how precisely the scope adjustments move the aiming point and determine how much backlash is present.

Reticle- A system of fine lines used to aim. (Duh! It’s the crosshairs)

Mill Dot- A system of dots spaced on the reticle lines used to measure range.

Windage- Movement from left to right or horizontal

Elevation- Movement up and down or vertical.

Drop- usually a measurement in inches of the path of the bullet in relation to the line of sight reflecting the effect of gravity on the projectile.

Selecting the ring and base combination that is right for the job will be the first hurdle. A quick look at the current Brownells catalog reveals 20 pages of scope rings and bases. One piece, two piece, Weaver, Leupold, Picatinny, See-thru, Unertl and many more can make it hard for the person that doesn’t know what they want. Maybe we need to clarify just what a good scope mount should do. Hold the scope securely in line with the position of the eye when the gun is mounted to the shoulder and return to the same place (zero) if it is removed and reinstalled. Being adjustable so the scope adjustments can remain close to center would be nice too. Most of the available mounting systems have something to offer. The old Weaver mounts are solid and return close to zero, The Old Redfield system is harder to remove and return to zero but it is adjustable for windage.

After selecting take a look at what will be holding the bases to the firearm. In most instances it will be screws. Overwhelming favorite is the 6×48 with the 8×40 gaining ground. The 6 is a wire gauge size and the 48 is the number of threads per inch. These small screws have proven adequate for many years, however as firearms have become more powerful and scopes larger the effects of recoil that must be endured by the screws that are responsible for holding it all together have raised the strength requirements. Poor screw fit due to being too long or too short has created the majority of problems associated with scopes but it doesn’t end there. Screw head diameter and wrong threads have also been real pain for the gunsmith trying to turn out quality work. These problems are usually avoided by buying quality mounting products. Even if you buy the best it is still a good practice to inspect all the parts for defects before assembling on the gun. Look close and make sure threads are there and that they go all the way to the bottom of the hole. Try the screws in the holes and make sure they are not loose if you wiggle from side to side.

After you are satisfied with the fit and quality of the bases and the length and fit of the screws it is time to attach them to the gun. Take your time and snug each screw individually and then check the base for tightness to the gun. This step is important to make sure all the screws are actually holding the base to the gun and not coming tight without the head of the screw resting against the base. After you are satisfied each screw is performing like it should you can tighten. Judgment and experience are a great help here but nothing really beats a torque wrench. Thirty inch pounds is plenty of pressure with a 48 thread.

While I don’t prefer Loctite on my guns some of my customers swear they need it so I comply with their wishes. Personally I would rather be able to check screw tightness later and know the screw is actually tight against the base and not just being held by the Loctite in the threads.

If this is a custom job or a cobbled together arrangement I will use a long straight edge on the bases to check alignment with the end of the barrel. With the straight edge resting on both bases it should parallel the bore and be taking a path of its own. This is easy to see with the straight edge by the time it gets to the muzzle but a small misalignment is very hard to detect when the front and rear bases are only a couple inches apart.

Now we can cycle the action and make sure the action works freely. If any screws are protruding into the receiver and impinging on working parts you will probably feel it but close inspection is still warranted to make sure there is no contact with the bolt that might affect accuracy by disturbing alignment.

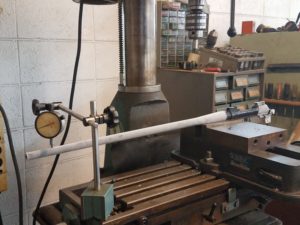
When all is well we can proceed to mounting the rings. I usually start with the front ring only and after mounting it snugly I will check ring height by placing the scope in the ring to make sure it clears the barrel. Then I use a long piece of round stock to check alignment with the bore. With the front ring in place the round stock which is no more than a long piece of aluminum rod long enough to extend from the rear of the receiver to the end of the barrel should be centered directly over the bore. If there is an alignment problem solve it by fitting or replacing before proceeding. Next the rear ring can be positioned using the round stock as a guide. Tighten the rear ring while watching the position of the round stock over the bore. It should not move. Again if there is an alignment problem solve it before continuing.

Now we have rings in line with the bore so they will they will not damage or kink the scope tube when they are tightened on the fragile scope tube. Another problem we are trying to avoid is placing any stress on the receiver from ring misalignment. This can be detrimental to accuracy just like a bedding problem would place stress on the receiver from beneath the action.

Now we have properly aligned and tight bases with rings in line with and parallel to the bore but we are still not quite ready to mount the scope. Our next job is make sure the individual bore of each ring is in alignment. We do this by lapping with a brass rod the size of the scope body (1 inch or 30 mm) coated with an abrasive lapping compound. The caps or tops are tightened only enough to contact the rod but allow movement so the twisting and front to rear movement of the lapping rod can proceed. When the two materials are rubbed together the abrasive will cut away the material in contact with the rod. If the rings are in perfect alignment (you wish!) the wear will show a pattern inside the ring of finish being removed on the entire surface. A normal result will be 20% of the finish removed after several minutes of lapping. For most installations getting the lapping above 60% will be a good fit. Since this is a fitting operation the rings and caps are now a fitted pair and should be marked in some manner to make sure they are not mismatched. This includes marking the cap not only as to which ring but also to prevent reversing the cap.

Whew! I told you it wasn’t easy but now you can clean off the lapping compound and mount the scope. All you have to do is get it straight in the rings and tighten without it moving and have it end up exactly where the customer wants it. Yes, in the end it is the customer that needs to be happy so with the job so at this point I usually leave the scope loose in the rings until the customer arrives to make the final determination as to how where it needs to be tightened. You might try to coach them a little by explaining the need for adequate eye relief and how if the scope is a little forward the head will come to a more consistent position on the stock and consistency leads to better shooting but in the end make the customer happy.

Using a scope reticle leveling device will stop a lot of disputes as you tighten the scope and hand it back and forth for the customer to check. These are fairly inexpensive and available from Brownells and others. Many people cant the gun without realizing it and nothing you can do will make them happy but putting the crosshairs level for them. Thankfully this isn’t a problem in most hunting situations since the distance is close and the target large in relation to a long range target and if the customer is a long range shooter they will already be schooled in the effects of misalignment.

This might seem like a lot of trouble but it really doesn’t take that much time after you have done a few and it just seems like a shame when all the work that went into an accurate rifle is compromised with a poor scope mounting job. I find writing up directions and handing out copies to customers that plan on mounting their own scope will generate a lot of scope jobs as the customer gains a better understanding of the importance of the job. As always, DO GOOD WORK!


Superpower


Finding Your Superpower

Not too long ago I was staying at my camp at Cedar Island. It was summer and I was busy inside with supper and other things. I had an outside light on the porch and it was well after sunset when I went outside. I was amazed at the insect life that had come to enjoy the light. Now we have bugs in New Bern and Cove City but nothing like Cedar Island. There were flying bugs, crawling bugs, black ones with big horns, green ones with big eyes and in every size from tiny to XXXXL. It made me wonder why they were so different. If I was in charge of creation I would have made two or three flying bugs and a couple of crawlers and that would have been enough. I would not have made skeeters, ticks, red bugs, yellow flies or green heads.

All those bugs point to an amazing fact. God loves variety! Countless species and plants cover our world and even humans come in so many shapes sizes and colors that it would be a nightmare to keep one of each in stock if you were a retailer. We use the term “creative genius” but when it comes to God it is just beyond description. So if we were created by such a creative genius then what are we? Who are we and why are we here? It just stands to reason that we just have to be absolutely awesome. A creative genius would never be satisfied with creating anything normal or average.

It doesn’t make any  sense that we spend so much of our energy trying to normal and average. How did it happen? Or maybe when did it happen would be a better question. Back in the 1960s NASA was spending money trying to win the space race and be the first to land on the moon. They realized they needed to think “out of the box” to do something that had never been done. After forming think tank groups they realized it would be helpful if they had a way to find out of the box thinkers. Another name would be the creative geniuses.

With money flowing they found an independent research firm that created a test for creative genius. The test was simple and easy to give and the results were excellent. Matter of fact it worked so well that the researchers said how about we give this test to kids. The test was given to 1600 five year old kids scattered across the country. Now what do you think the percentage to test as creative genius was? 10%? 20%? If you have a five year old or you remember being 5 it probably won’t surprise you to know 98% tested to be creative geniuses. 98%! Five year old kids don’t just think out of the box they have no box. Talk to them and listen. They want to be mermaid veterinarians and spend weekends in space.

Finding so much creativity energized the researchers to repeat the test in 5 years. Evidently a lot of change takes place between 5 and 10 because the percentage to test creative genius dropped to 30%! Wow, what happened? They haven’t done anything but go to school and play and they dropped 68%. Researchers were not excited but went forward with another test at age 15. Now how creative are teenagers? Once again a huge drop in creative genius to only 12%. Researchers were too discouraged to continue testing the group but since then the test has been given to over 1 million adults. So how creative are people like you and me? Adults test at 2% in the creative genius category. From 98% to 2%! Why?

Other research has proven that by age 5 your personality has fully developed and you are who you are going to be. While you were obviously  created by a creative genius to be a creative genius the world doesn’t like it. The world wants conformity. Kind of a huge pressure of collective thought that comes from us wanting others to be like us. We want to be able to judge so we want all apples and no oranges. If we are the same then we measure ourselves and  do better than others or have more  and feel better about our accomplishments. We want credit for achievement. We want to know what average is so we can have others see how far above average we are. It’s just the way the world works.

The question is what are we giving up when we depart from what we made to be? If you look at my workbench or tool box you will see what looks like hundreds of tools. Some are everyday tools and some are speciality tools for my profession. Many are handmade just to do one special job that nothing else can do. Many of these tools are an absolute necessity for me to do my work. Many were made out of the best quality materials and ground and polished to exactly the right shape. Then they were hardened at 1500 degrees and drawn at 500 degrees to be tough and durable. They are important necessary and valuable to me but when I die most will be discarded as trash. Without the craftsman the tools have no purpose, no value, no future.

We should know that if we were created different it has to be for a reason. It seems obvious we were made for different purposes or jobs. Just like tools if you try to do something you were never designed to do you probably won’t have a good outcome. So are there things I can’t do? Well basically yes. Apostle Paul said for me nothing is off limits but a lot of things are not profitable. We have all seen it and tried it more than once. The basketball player that is too short or the horse jockey that is too big. The boy that struggled to pass basic math might not be the best one to send to the The School of Math And Science. A mule will never win the Kentucky Derby!

But what about “Be all you can be” or “you never fail till you quit” or “shoot for the moon”? Most of us grew up in a world that wanted you to work on your weak points. We got a report card and the next grading period would be focused on the low grade to pull it up to average. Even if this was a subject that held no interest and would never be used. Researchers have prover that people had several time more growth if the spend the available time working on the strong subjects. (Whew! Wish I had that research to show Mama when I flunked French I in 9th grade!) The facts and the Bible agree that you need to invest time in doing an inventory on your abilities.

Paul tells us in Romans 12 that we should present the work of our bodies as a living sacrifice. It kind of scary to think about doing Christian service. Giving ourselves over to God scares us because we think God wants to change us. He want to make us something different, something we were never meant to be. It’s actually the opposite.

Verse 2 says That the renewing of our mind will put us in touch with the perfect will of God. Renewing, meaning making our mind like it was. Remember you were to be a creative genius?  It doesn’t say replacing your mind or become something you were never made to be. Renewing is restoring.

Verse 3 says to every person not to think of yourself more highly than you should ( who popped in your mind?). But to think soberly with sound judgement of yourself. Just as bad and sometimes worse is the habit of false humility. How many times have you stopped short and not done something that was needed because you sold yourself short and said “I’m not good enough.” Don’t ever talk bad about yourself. When you work for God have confidence. Would you want your surgeon to come in and say he really wasn’t very good? I learned from an Olympic shooting coach that you start to believe what you tell yourself. You should be reminding yourself that you are awesomely created by a creative genius who is interested in everything you do! Besides there will always be someone willing to take the job of making you humble.

Verse 4 and 5  reminds us just as the body has many members with different functions the body of Christ (us) has many members with different functions. It is okay to be different and even weird if you were made that way! It was for a reason.

The rest of chapter 12 names a long list of spiritual gifts that each of us have been
given in different proportions and gives us the instruction “to exercise them accordingly”.

So what’s the point or as I ask my students “what did you learn?”

1. I am designed by God to be different for a reason.

2. I have gifts (superpowers) given by God so I can do certain things better than others.

3. I have to make an honest frank assessment of what I can and cannot do.

4. If I focus my efforts on being what I was created to be instead of what the world wants me to be I will be the most effective and best version of myself.

5. While I was created with certain gifts it is completely up to me how or if I use them.


Timothy P. Whealton

Help! My new rifle doesn’t group

It brand new and shoots 3 inch groups at 100 yards.

It shows up a lot in September. They got a new gun and went to the range to sight in and it doesn’t shoot well. Maybe they have an unrealistic idea that all guns shoot in one hole or should. As the gunsmith you will have to do a little detective work before you start chasing down the problem. First see if you can isolate the problem to one area.

  1. The shooter-  Ask how they shot the gun. Off a bench? Sand bags? truck hood? Distance? Have they shot before? Have they ever shot a small group? Do they have another rifle that shoots well? Most deer hunters don’t practice and have little experience shooting. The average hunter sights in with less than 10 rounds and then fires 5 to 10 rounds during the year. Contrast that with a high-power competitor that shoots 3000 aimed rounds a year and you realize your customers will vary in experience and capability.
  2. The ammo- always surprised how many people think a good gun will shoot bad ammo. Its more like a race car. Good guns are built to use the best ammo and might even shoot bad ammo worse than a clunker. Most guns will shoot some loads better than others. It is always best to let the gun tell you what it wants to shoot instead of you trying to make it shoot what you want. No I don’t like load sensitive rifles but that doesn’t mean I don’t have to live with them. Factory ammo is much better than it use to be. Yes there is some bad stuff on the market but you will basically get what you pay for. I usually have a standard test load for each caliber. It might not be the best load for that particular gun but it will usually be good enough that I will know that if it wont shoot my test load something is wrong. Example- Federal Gold medal Match for 308 loaded with 168 Match Kings. If it wont shoot that then something is wrong!
  3. Optics- Let me just say this first. I hate scopes. They can make your life miserable. I can find the flaw in the barrel, action or bolt but you are always guessing with the scope. Use your bore-sighter and turn the adjustments both ways while tracking the movement of the reticle. It should be smooth and reverse direction without backlash. It should be close to the center of movement. Scopes don’t work well at the end of adjustment. Check all the screws in the base and rings. If they were put on with thread locker then you need to understand that the screw might be tight but the base can be loose. The tightness you feel is not the head of the screw pushing against the base. It is the threads locked. If all checks good and you still suspect the scope use a known good scope for a test. I didn’t say a new scope or another scope.
  4. Barrel- Look first down the outside while holding it up to a light. The light reflected along the outside will show a bulge. Inspect inside with a borescope if you have one. Check the headspace. Pay close attention to the throat. That is the short section in front of the chamber where the bullet first hits the rifling. If the throat is crooked or damaged (and a lot are) the bullet will be pushed off center when it enters the rifling and accuracy will suffer. I make a chamber cast with cerrosafe from Brownells. It is reusable and melts in boiling water. Nothing else will show you the throat as clearly. Clean the bore and then push a tight oiled patch down the bore while feeling the resistance. If it has a loose section it will never group. Slug the bore to confirm.
    Cartridge and cast of the chamber

    Notice how short the throat is. This is a factory 300 win mag. Look where  the rifling starts on each groove. If it starts at the same place all the way around that is a good throat.

    If the is nothing else apparent I will freeze a barrel and then watch the barrel return to room temperature to see if the barrel is warping during temperature change. Just put the barreled action in the freezer overnight and then clamp it in your milling vise with a dial indicator on the muzzle. Don’t touch it and let it warm to room temp. If the bore is off center it will be a banana.

    freeze test


  5. Bedding- What you want bedding to do is cradle the action without putting stress on the action that will shift during firing. While target guns are designed to float the barrel most factory guns will allow the barrel to push against the forearm. If the action isn’t bedded it will probably be better left with some upward pressure. Use your bore sighter again (collimator) and look through the scope. push on the side of the barrel and make sure it returns to the same position. Then tighten and loosen the guard screws and look for movement. If the barrel or action can move and stay in more than one place that is a problem.

Accuracy problems can be challenging but having a system and a lot of time and effort will give results. The problem for the gunsmith will be getting paid for his work! Knowing gunsmithing and making money don’t always go hand in hand.