
Muzzle Brakes
These things seem to go in and out of style like sideburns. Maybe a magazine article or a picture in something popular starts it and for a while I put on brakes. Then after a year or two with the darn thing they want it removed and recrowned like it was never there. After a few years as a professional gunsmith I quit telling people what I thought was best and just did what they wanted. If they want to know what I think I tell them. but only if they ask for it. In keeping with that statement let’s talk about what types of brakes are available and how to do a perfect job installing.
First you have to know how the brake reduces recoil. Recoil comes from two sources. The first is the equal and opposite reaction of the small piece of copper and lead being propelled down range. This is actually not all that much. After all most bullets are fairly light in weight. The second source of recoil is the jet of gasses that exit with the bullets. Did you ever take off in a jet airplane? This phenomena is the main source of recoil and can be reduced with a well-designed brake. The job of the brake is to divert these gasses to the sides with little remaining to exit out the front with the bullet. If the gasses are diverted equally all the way around they cancel out any push on the barrel and the effect is zero.
Some brakes take this a step farther and direct the gasses to the rear at a slight angle. This actually results in the brake being pushed forward and countering recoil. Unlimited class pistol used in speed events are probably the best example of this. They divert so much gas up and back that some of the pistols actually have negative recoil. When the pistol fires it pulls forward and down! I have never seen a rifle brake achieve this but they are very effective at reducing recoil overall.
So what is the down side? There has to be one or every rifle would have a brake. The down side is noise, not just some but lots of noise. If you shoot a magnum rifle with a muzzle brake even one time without hearing protection you will be convinced you have permeant hearing loss. In our area deer hunters use box stands and sometimes don’t hold the muzzle out the shooting port or hold just barely out to not spook game. It is like having two boxers punch you in the ear at the same time. You can also get this same effect if you get out of your truck and shoot holding the muzzle over the bed of the truck. It works like the cheerleaders megaphone. If you read the ads many claim to have the “quiet brake” but I haven’t found one.
I have machined my own brakes but it just takes too much time. Order the one the customer wants but make sure it is larger in diameter than the barrel so you can turn it down to fit the contour. I like the Shrewd brakes from Brownells and try to keep a few in stock since they will work for several size bores. These come with an exit hole for 22 so don’t forget to open up this hole .020 larger than bullet diameter.
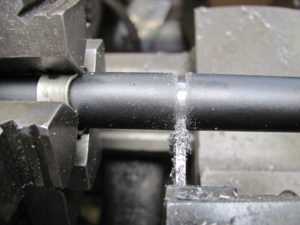
The machining of the barrel is very similar to the threading of the breech end into the receiver. These threads must be absolutely square with the bore so the muzzle is placed in the 4 jaw chuck and centered less than .001 thousandths. The other end must be centered inside the headstock or on the outboard end but some means. The threads must be beautiful little 60 degree angles and smooth to the touch. Take a lot of cleanup passes while you thread and understand that a cleanup pass removes metal too. The shoulder on the barrel must be absolutely square and maybe very very slightly undercut. This will make the seam disappear when the brake is tightened.
While the barrel is centered on each end and running true recut the crown as part of your job. It will only take a couple of minutes and you will probably help accuracy because what was there can’t be as good as your work. Use your favorite but make sure it is beautiful and free from burs. It might never be seen but so are the parts of the Rolex!
Figure 13The entire barrel has to be centered to make sure your work is in line with the bore. Here is the outboard end being centered. Note the soft copper shims to protect the barrel.
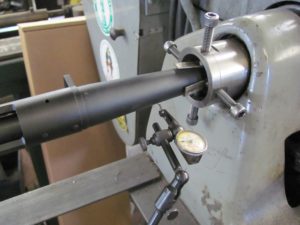
Figure 14 Holding the muzzle on the tailstock keeps it close to center while working on the outboard end.
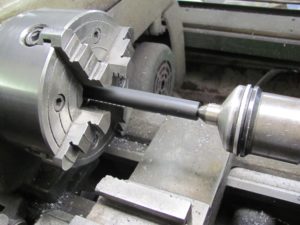
Figure 15The barrel must be centered on the bore.
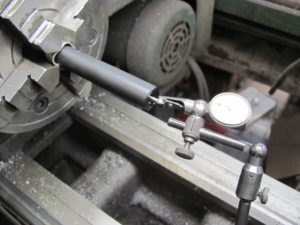
Figure 16Measure how much you want to remove (if any) and how long you want the threaded tenon to be
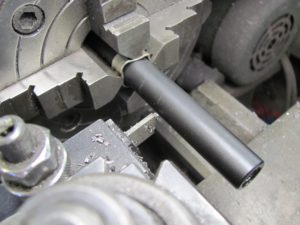
Figure 17 An electric bandsaw is faster but the cutoff tool works well if you are careful.
.
Figure 18 after cutting it is a simple operation to crown the barrel from the inside out. Note the compound set at 11 degrees.
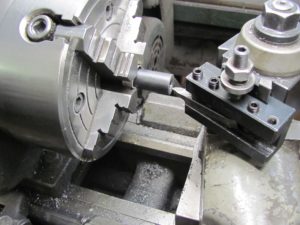
Figure 19 next the tenon is cut to size.
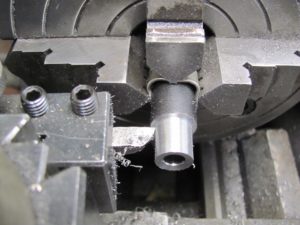
Figure 20 Practice threading on scrap stock till you can make perfect threads before you try this on a good barrel!
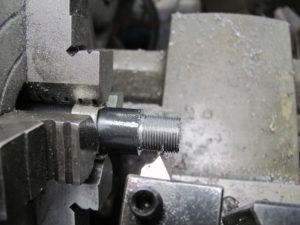
Figure 21 Use the brake as your thread gauge.
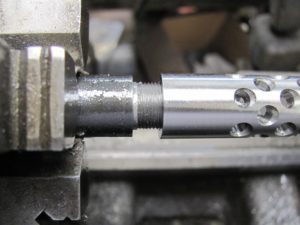
Figure 22 Make sure the exit hole is correct size for the caliber. I make mine .020″ larger than the bullet.
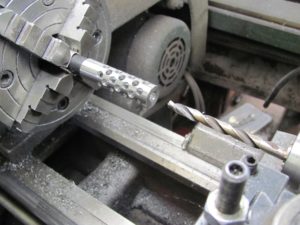
Figure 23 With the compound set at 5 degrees I taper the brake down to barrel diameter.
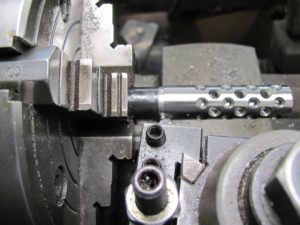
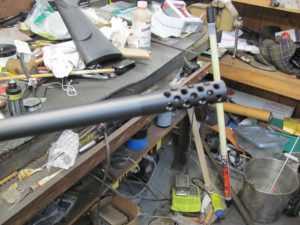
Figure 24 After matching barrel finish and bluing it is ready for the customer. Might be a good time to straighten up the work bench too!
r
Some customer want the brake to be removable so they can shoot off the shooting bench without recoil and remove for hunting. If this is the case make a tool to fit the holes in the brake so they won’t deform the brake with a screwdriver trying to stick it in the holes. Remember if it looks ugly a year later and somebody ask who put it on the answer will be that gunsmith down the street without the explanation that it was damage by an ignorant attempt to remove or tighten. I also make a threaded knurled blank to screw on when the brake is removed to protect those beautiful threads. If the installation is permanent I use medium Loctite to secure.
With the brake tightened securely we can turn the outside to the same diameter as the barrel or taper slightly for a beautiful job. If the barrel is blue steel I caution the customer that the job may require bluing to achieve a good job. You can try but you can’t guarantee that you won’t leave marks on the bluing when you tighten the barrel in the lathe chuck. Use soft shims and be careful but if you scratch the barrel and you have to reblue for free you will basically lose money on the job unless you can do a satisfactory job with touch up. If the barrel is stainless make sure the brake is stainless and blend it all together with a nice wire wheel finish. It looks great.